Build a smart-fan
To bring fresh air into our bedroom we had a decentral HRU installed, but it was too noisy to catch much sleep…
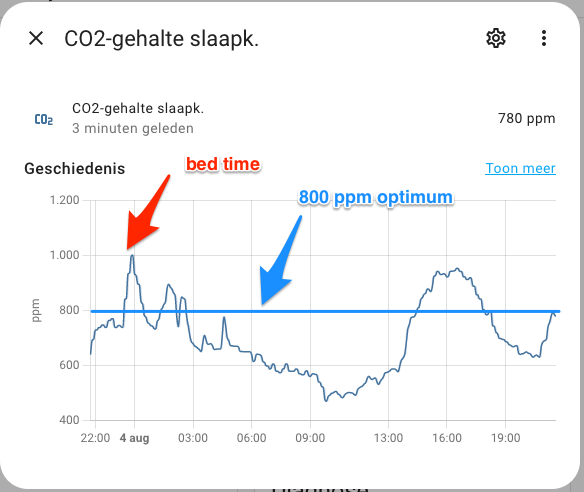
Because we prefer a temperature of 18˚C, heat recovery in ouw climate zone isn’t that useful. Because space was stille limited, I installe en axial fan with variable speed EC motor connected to an ESP32 the revs it up when the CO2-level nears 800 ppm. Read on for our setup:
Hardware used
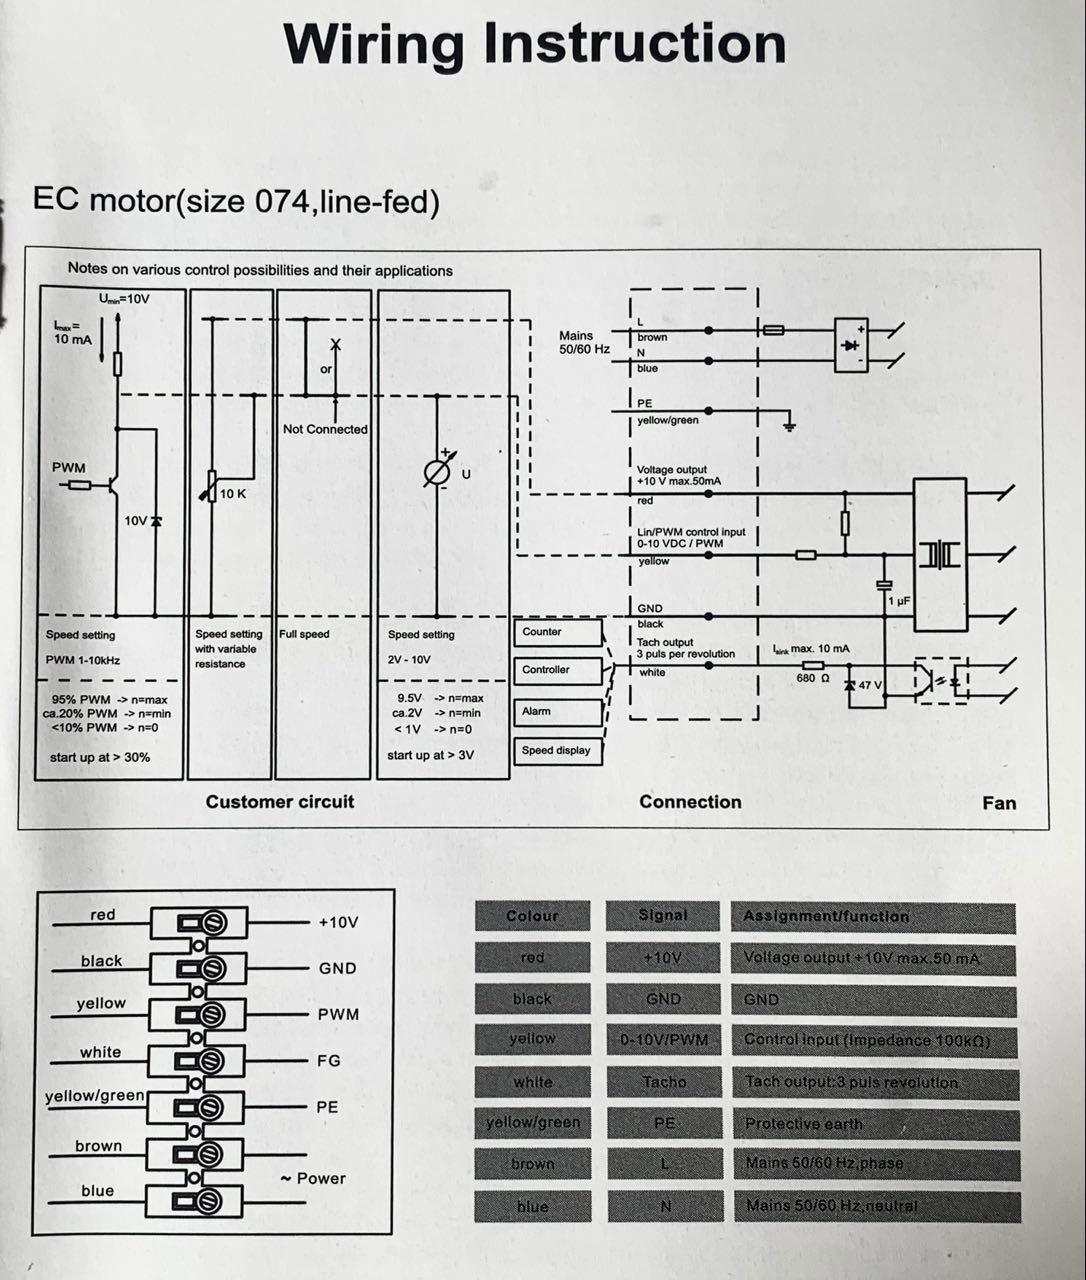
- Axial fan Ø125mm with variable speed EC motor, eg. the Whisper Gold Line EC. You don’t need the 10V controller, but order some spiral tubes, a muffler and connection pieces.
- M5 Stack Atom Lite. A compact 25x25mm SOC with built-in RGB-led and button. I ordered my Atom here
- USB-A to USB-C cable
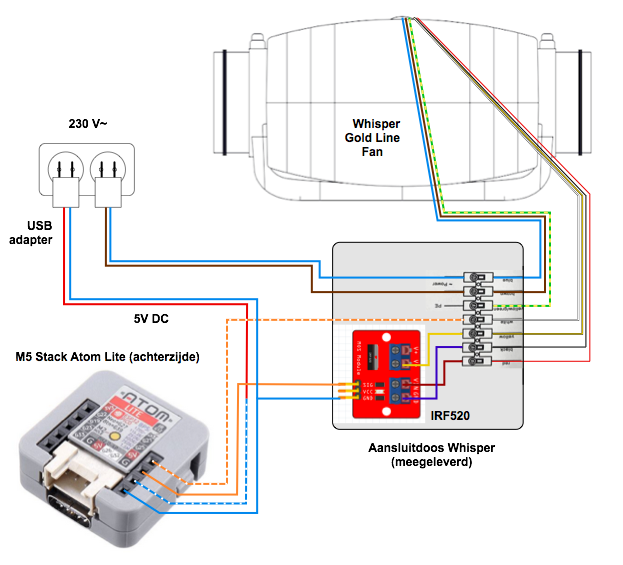
- A IRF520 MOSFET breakout to boost the PWM-signaal from the Atom pin for the 10V= fan control
- HomeAssistant with ESPHome Add-on IDE to write and install code on the Atom and interact with the unit
- Automatations on the Atom Lite (ESP32), written with ESPHome, to make it respond to
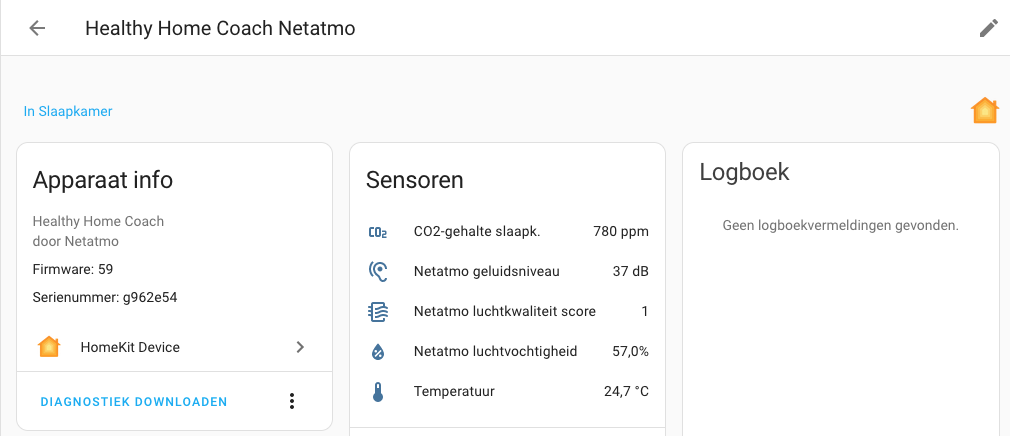
- CO2-sensor integrated in HomeAssistant, eg. Netatmo Healthy Home Coach (this info can appear in HomeKit too, using the HomeAssistant HomeKit Bridge, but it doesn’t work directly from HomeKit.
CO2 meten
Place the CO2 sensor in your bedroom and add the HomeKit Controller integration in HomeAssistant to display the readings and use them to control the fan speed.

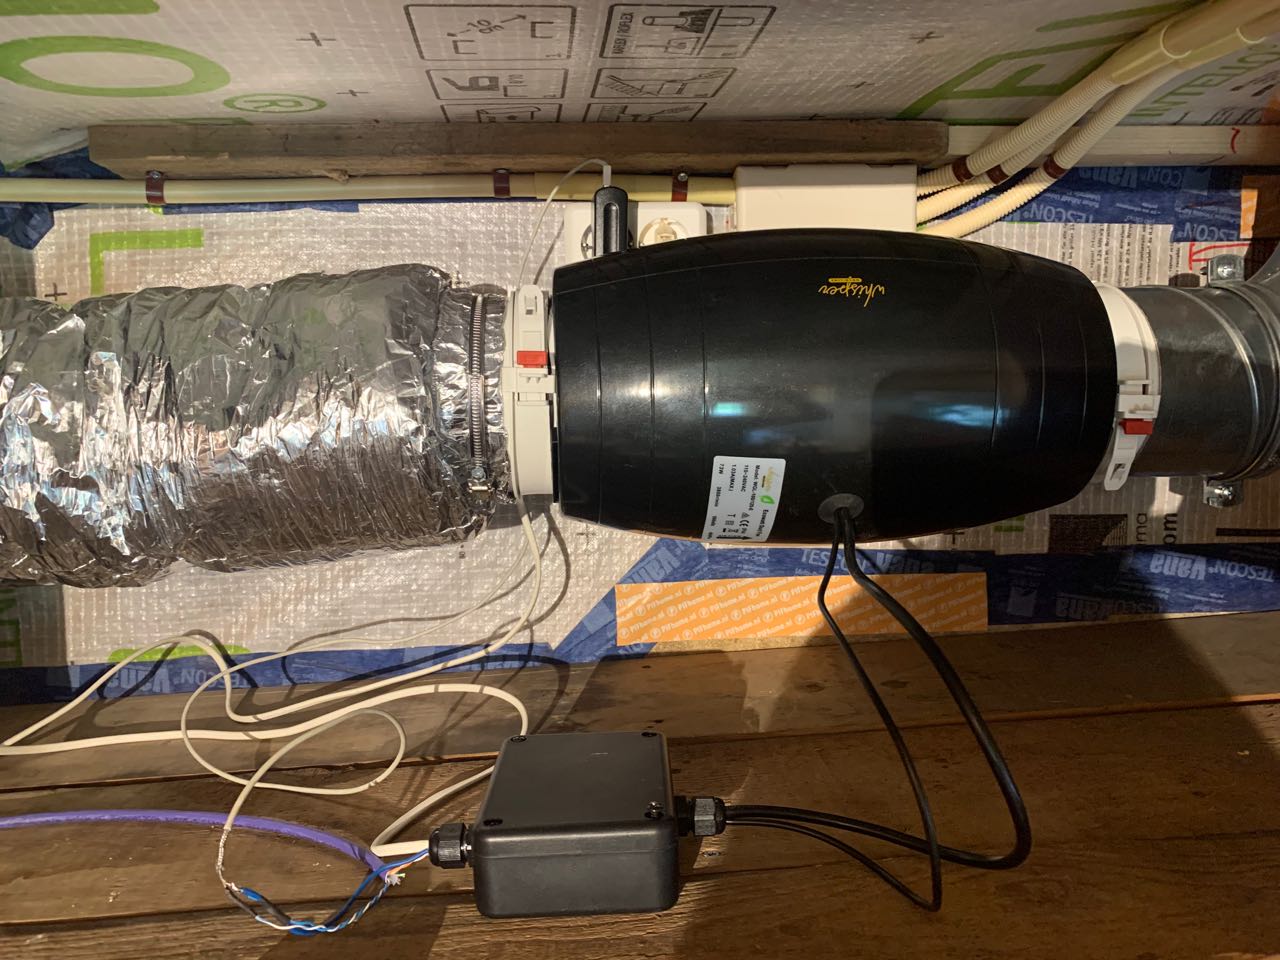
Fan connections
Install the fan, ducts and muffler next to your bedroom. I Found a space over the closets in an adjoining guest room, that will profit as well.
You will need mains sockets for both the Whisper Gold Line fan and a 5V USB adapter that will power the M5 Stack Atom.
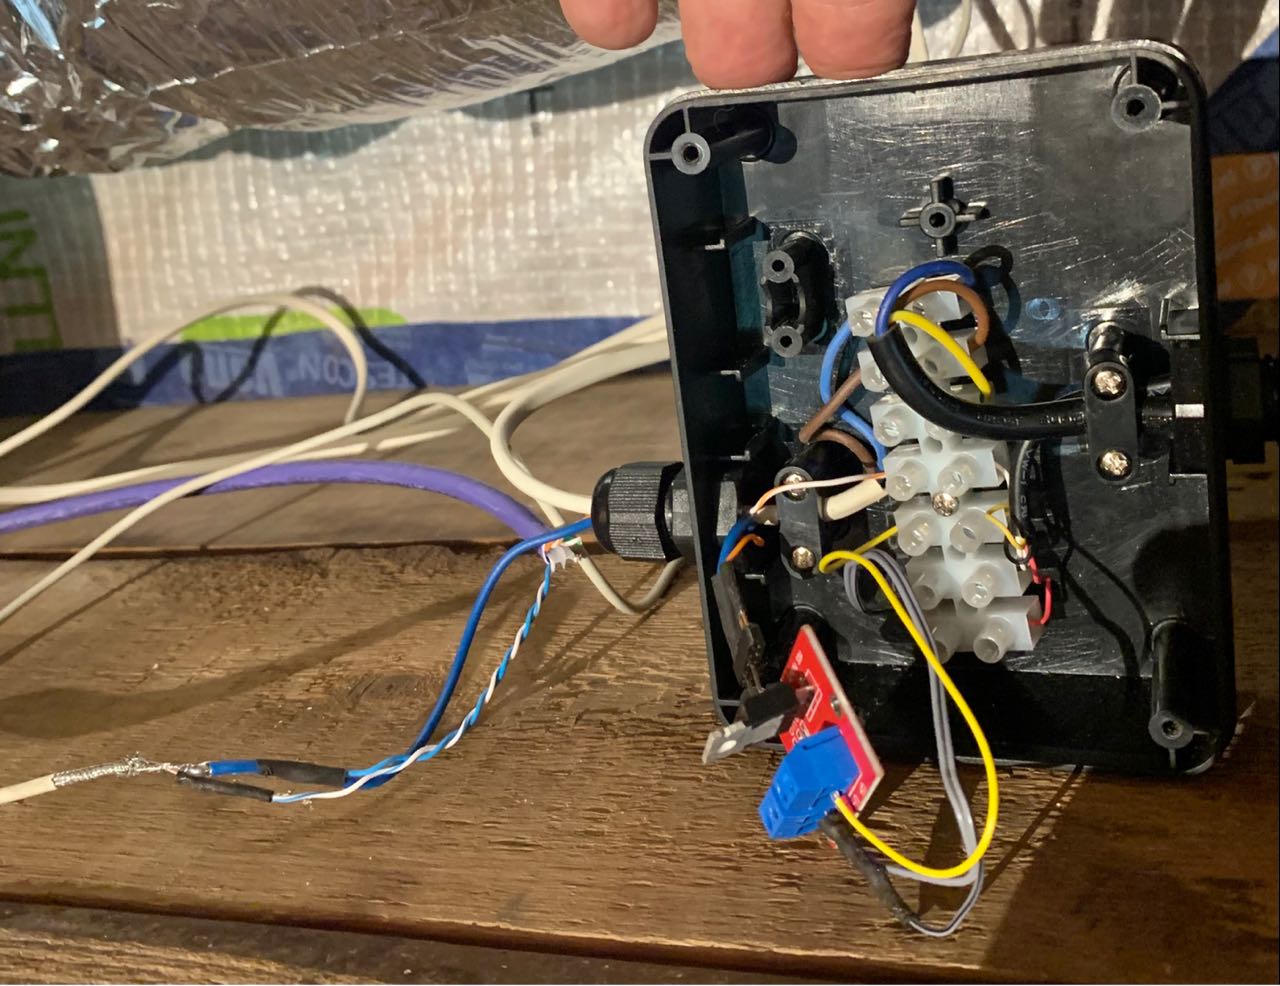
The Whisper Gold shipment included a spline box for both 230V power and the 4 control wires:
M5 Atom Lite connections
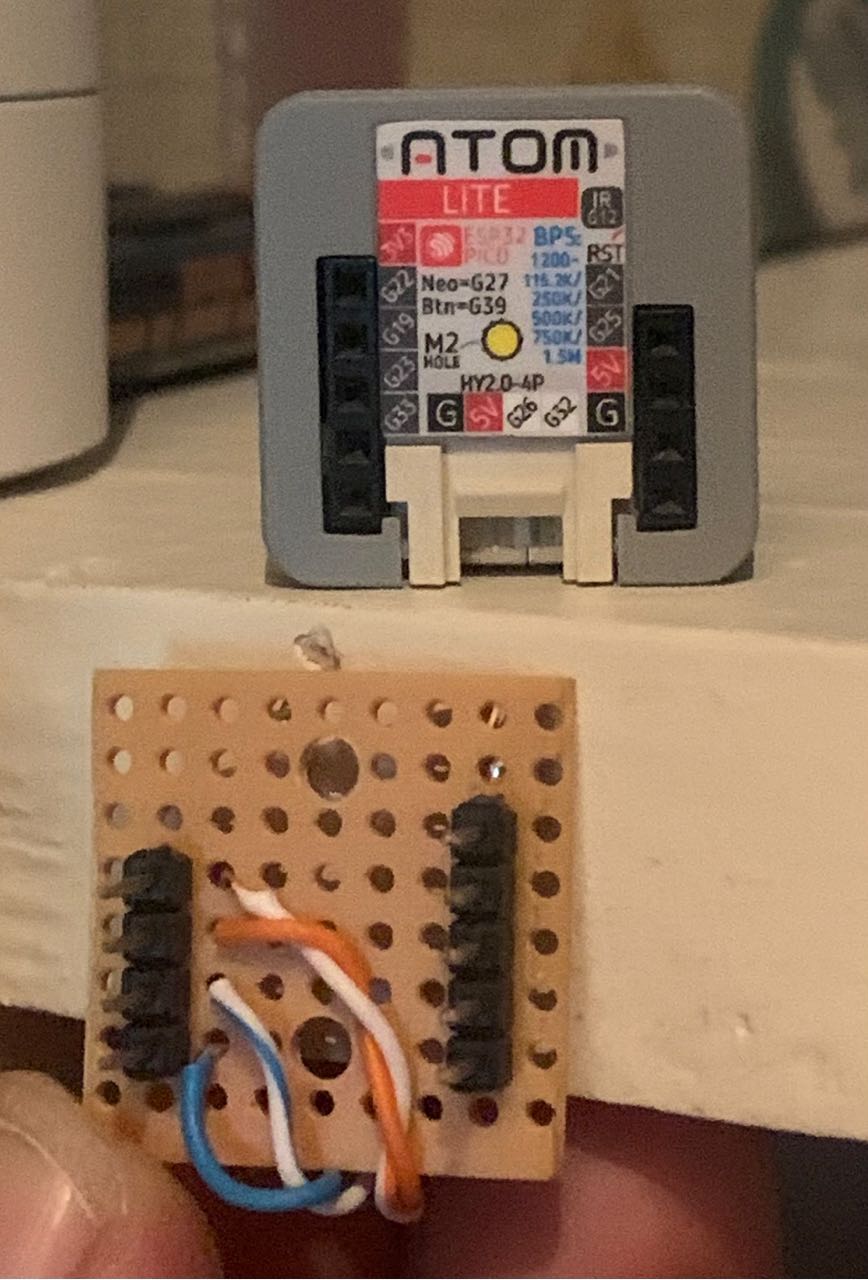

From the fan I ran 2x2 wires in a piece of UTP-cable to power the Atom with 5V= and connect two pins to control the fan. You need just a single line of four 2.54 mm female sockets at the back of the Atom, see picture. GPIO25 (orange) is our PWM-output. GPIO21 (orange/white) is used as input for the tacho pulse from the fan.
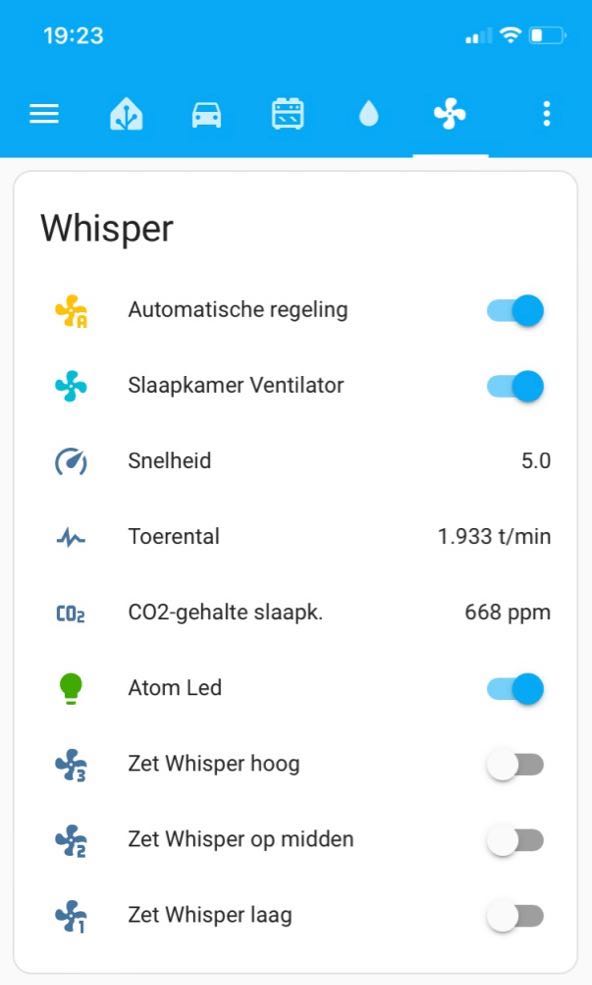
After booting, the color of the Lite indicates the CO2-level (Green < 500, Red > 800). The brightness of the led shows the fan speed: brighter = faster. A click on the button will set fan operation to manual and increase the speed by 10%. When at 80% the next click sets operation to Automatic, The next click turns the fan off eg. for when you are away for a couple of days.
Atom Lite code
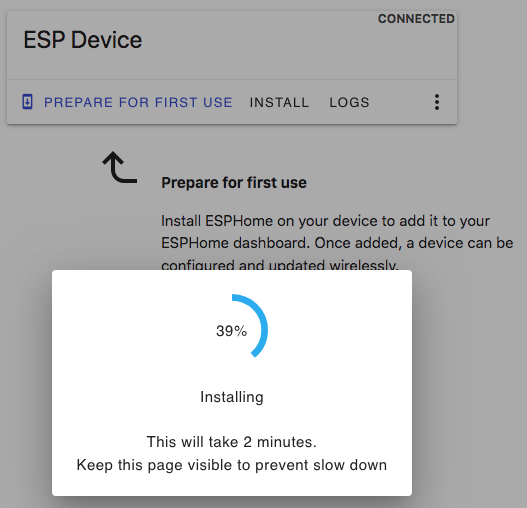
Download the yaml code and upload it to the M5Stack Atom Lite (ESP32) using the HomeAssistant ESPHome IDE. When this is your first application on the Atom Lite open Chrome browser and navigate to ESPhome Web, connect the USB cable from the Atom to your computer, click Connect and select your USB port.


The ESP32 configuration consists of:
Basic setup:
esphome:
  name: m5atomlite-whisper
  friendly_name: M5Atom Lite Whisper

globals:
  - id: speed_set_int
    type: int
    restore_value: yes
    initial_value: '4'
  - id: automatic_co2
    type: int
    restore_value: yes
    initial_value: '1'

esp32:
  board: m5stack-atom
  framework:
    type: arduino
Create a speed_fan object:
fan:
  - platform: speed
    id: whisper_fan
    name: "Slaapkamer Ventilator"
    output: whisper_fan_pwm
    speed_count: 10
    on_turn_on:
      # publish set speed
      - sensor.template.publish:
          id: whisper_speed_step
          state: !lambda 'return id(whisper_fan).speed;'
    on_turn_off:
      # publish set speed
      - sensor.template.publish:
          id: whisper_speed_step
          state: 0
      # set brightness
      - light.turn_off:
          id: led
    on_speed_set:
      # publish set speed
      - sensor.template.publish:
          id: whisper_speed_step
          state: !lambda 'return id(whisper_fan).speed;'
      # set brightness
      - lambda: |-
          // adjust brightness for any speed change
          auto call = id(led).make_call();
          call.set_state(true); // turn the light on if it was off
          auto n = 0.05 * id(speed_set_int);
          call.set_brightness(n);
          call.perform();
Create a PWM output to control the fan speed:
output:
  - platform: ledc
    # Fan PWM
    # Connect MOS-SIG to GPIO25, MOS-GND to GND; Whisper yellow to MOS V-, black to OUT-GND, red to OUT+10V
    id: whisper_fan_pwm
    pin:
      number: GPIO25
      inverted: true # MOS V+ did not work. V- did, so inverted PIN
    frequency: 10000Hz # lower if it whines
A button (switch) to set Automatic operation:
switch:
  - platform: template
    id: automatic
    name: Automatische regeling
    lambda: |-
      if (id(automatic_co2) == 1){
        return true;
      } else {
        return false;
      }
    turn_on_action:
      then:
      - fan.turn_on:
          id: whisper_fan
      - lambda: |-
          id(automatic_co2) = 1;
          // next block to match thresholds in sensor.co2_measurement block above
          ESP_LOGD("ATOM", "Whisper Auto ON, CO2: %d", id(co2_measurement).state);
          if (id(co2_measurement).state > 1300) {
            id(speed_set_int) = 8;
          } else if (id(co2_measurement).state > 800.0){
            id(speed_set_int) = 7;
          } else if (id(co2_measurement).state > 700.0){
            id(speed_set_int) = 6;
          } else if (id(co2_measurement).state > 600.0){
            id(speed_set_int) = 5;
          } else if (id(co2_measurement).state > 450.0){
            id(speed_set_int) = 4;
          } else if (id(co2_measurement).state > 350.0){
            id(speed_set_int) = 3;
          } else {
            id(speed_set_int) = 0;
          }
          id(whisper_fan).speed = id(speed_set_int);
    turn_off_action:
      then:
      - lambda: |-
          id(automatic_co2) = 0;
A sensor to fetch CO2 sensor data from HomeAssistant to the ESP32:
sensor:
  - platform: homeassistant
    id: co2_measurement # this is the ID for a new local sensor, and copies:
    entity_id: sensor.healthy_home_coach_netatmo_carbon_dioxide_sensor  # this points to the front end (Netatmo) entity
    unit_of_measurement: 'ppm'
    filters:
      - round: 0
    on_value_range: # next block to match thresholds in switch.automatic_co2 block below
      - above: 0
        below: 350.0
        then:
          - if:
              condition:
                lambda: return id(automatic_co2) == 1;
              then:
                fan.turn_off:
                  id: whisper_fan
          - light.turn_off:
              id: led
          #- logger.log: CO2 < 350 ppm
      - above: 350.1
        below: 450.0
        then:
          - if:
              condition:
                lambda: return id(automatic_co2) == 1;
              then:
                fan.turn_on:
                  id: whisper_fan
                  speed: 3
          - light.turn_on:
              id: led
              red: 0
              green: 100%
              blue: 0
          #- logger.log: 350 < CO2 < 450 ppm
      # ETC.
      - above: 1300.1
        then:
          - if:
              condition:
                lambda: return id(automatic_co2) == 1;
              then:
                fan.turn_on:
                  id: whisper_fan
                  speed: 8
          - light.turn_on:
              id: led
              red: 100%
              green: 0%
              blue: 50%
          #- logger.log: WARNING CO2 > 1300 ppm
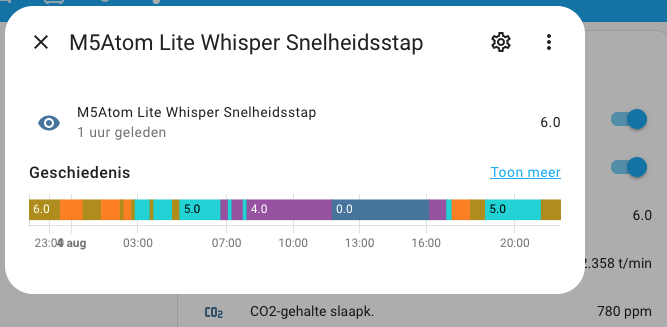
When the fan is in Automatic mode, the code will adjust the fan speed every time it receives a new CO2 reading from the bedroom. It also updates the color of the LED (Green = clean to Brown = dirty).
The tachometer sensor provides feedback on the actual Whisper fan speed (3 pulses per revolution, so we have the multiply: 0.33 filter):
sensor:
  - platform: pulse_counter # -meter too many data points
    # toerenteller Whisper witte draad
    name: Toerental
    id: whisper_toerental
    pin:
      number: GPIO21
      # inverted: true
      mode:
        input: true
        pullup: true
    unit_of_measurement: 't/min'
    internal_filter: 5us
    update_interval: 10s
    filters:
      - multiply: 0.33 # (3 ticks per revolution as per Whisper Gold manual)
      - round: 0
Home Assistant settings
Back in HomeAssistant open the YAML-editor mode of a new Dashboard and paste in this yaml code to create the fan control UI.
Adapt the entity names to your setup, eg.
- The name of your CO2 sensor
- The numbers for your speed_fan, fan sensors and -switches
I wish you all fresh nights!
Enjoy Reading This Article?
Here are some articles you might like to read next: