Goodbye Hypersite
To archive an application that I created and ported over the years, here is the final readme of Hypersite.
What is HyperSite and how does it work?
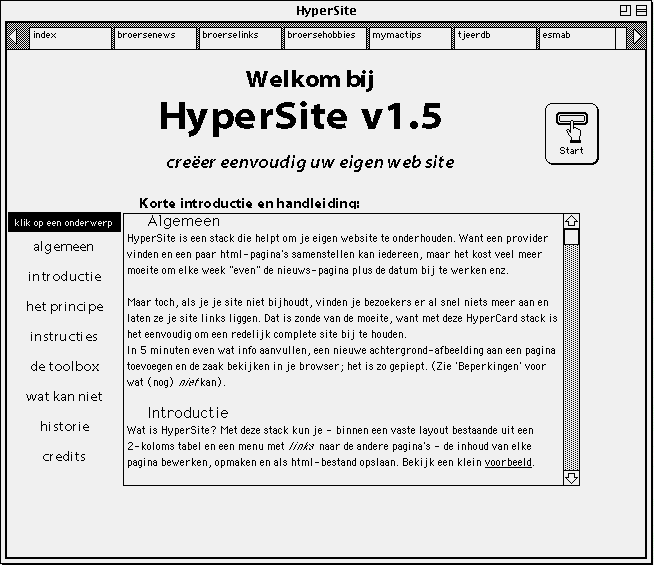
HyperSite is a stack that helps you maintain your own website pages. Finding a provider and creating a few html pages is no big deal. But it does take effort to ‘just’ update the content, including the date in the footer etc.
But if you fail to update your site regularly, visitors will look elsewhere. Now that would be a shame, as this HyperCard stack is not expensive and a rather simple CMS to manage your site contents.
Quiclky add a few lines, add a new background image to a page (remember that?) and preview the changes in your local browser before uploading it with a single click; Done!
(See Limitations as for what can not do).
Principle
What is HyperSite? With this stack you can - within a fixed layout consisting of a 2-column table and a menu with links to the other pages - edit, format and save the content of each page as an html file. Take a look at a small example.

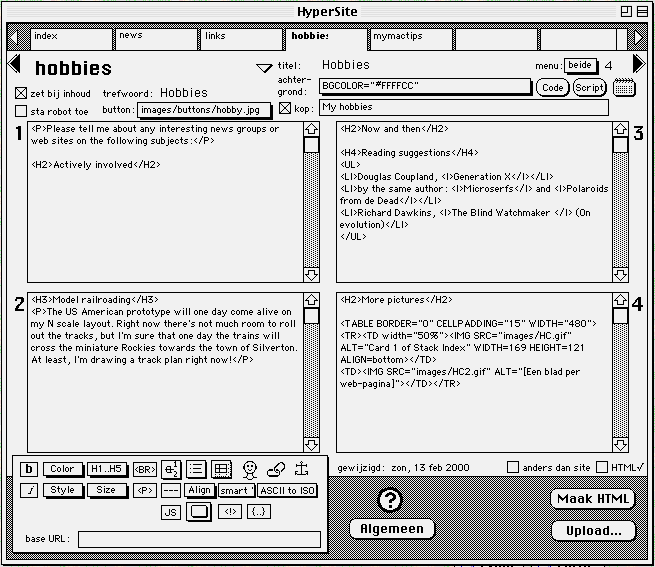
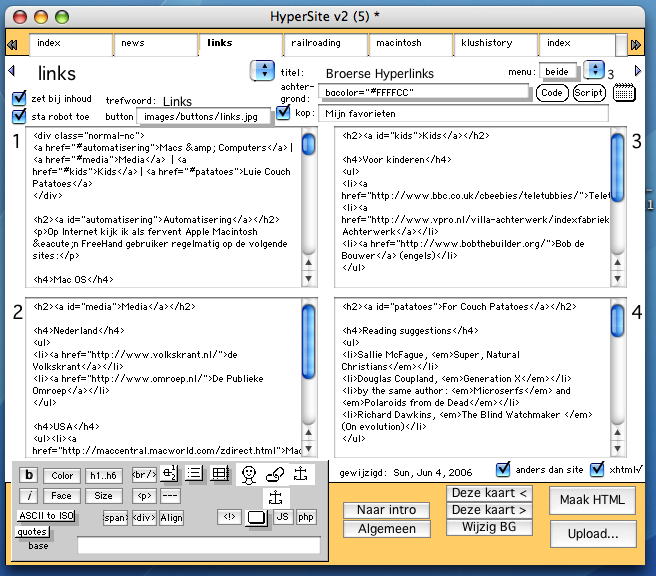
For each page of your web-site there is a separate card, on which you can enter your own information in 4 text fields. As far as you can influence the formatting within the standard HTML 3.2, a number of tools are available via a series of buttons at the bottom left of the screen. There are also buttons to create ‘links’ and ‘anchors’.
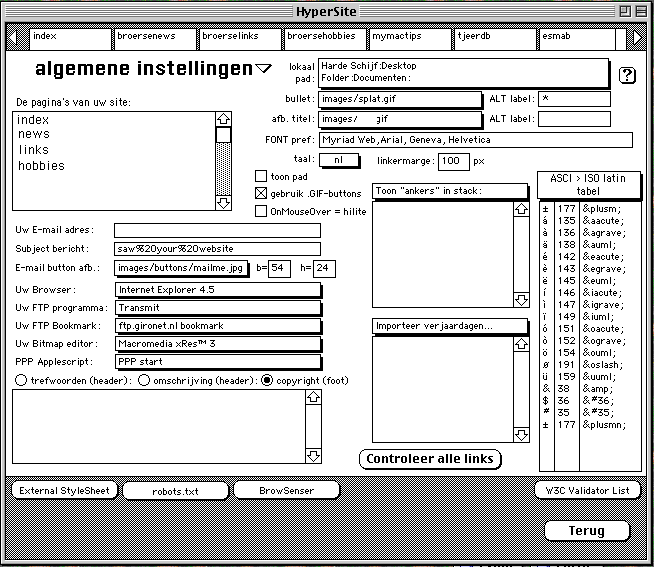
General information that is the same for each page can be entered in the ‘General settings’ card. If you then click on the ‘Create HTML’ button, a complete HTML file will be created on the hard disk from all that data. Via the ‘Upload…” you can then send those files to your provider. Click on the ‘Start’ button at the top right of this screen to continue…
This stack uses other programs, which need to be installed on your computer:
- a web browser, like Safari or Firefox;
- an FTP-program, like Transmit by Panic;
- a graphics program to create or adapt images for the web, like Macromedia Xres (remember that one?), Photoshop or Graphic Converter.
Instructions

1. Click the “Start” button
Fill in at least the following information:
- a name for each page of your site, which will then appear as TABs at the top (use only lowercase letters and no spaces);
- A "local path", i.e. the place on your hard drive where all files associated with your site are (temporarily) stored. Because of the way HyperSite works, there should be a second folder called "Images" in this folder. This is where you save all the images, so that the root folder remains well organized (thanks to Claris HomePage);
- your E-mail address;
- your internet browser (use a dialog box to point out where it is located on your computer);
- a Fetch bookmark, which connects to your place on the server;
- an Applescript file that starts the Internet connection with your ISP, e.g. the "PPP start" script in the "AppleScript Tools" folder.
Not mandatory:
- the name of a.GIF image that appears as a title on all pages, e.g. your logo;
- The name of a.GIF image that comes as a 'bullet' for each of the 4 text blocks.
2. Continue by clicking on the first tab slip at the top left
Fill in the Name and Title for this page, and possibly. A background image or color. For each page, type the information you want to show in text boxes 1 through 4. A field can also be left empty.
Minimal HTML knowledge: After each line insert a line break <br> and around paragraphs insert <p>…</p>, otherwise all text will be one block.
3. Assign extra markup
Select a text fragment with the mouse and click on one of the ‘buttons’ in the ‘Toolbox’ at the bottom left. For details refer to the Toolbox section.
4. Special characters
If there are ‘special’ characters in your text, for example “ü” and “é”, select them and click on the “ASCI to ISO” button to make sure that these characters appear clearly for everyone to see. If you click on this button without making a selection, all the text will be checked, but it will take some time.
5. When you’re done with a page
Click on the “Create HTML” button. From all the information in the stack, an HTML file is created, the standard language of the world wide web. A text message will appear with the name of the file, which is the same as the name of your page + the extension “.html”. To export all pages as HTML files at once, hold down the Option key while clicking the “Create HTML” button.
6. Preview
After the page(s) in question has been saved, you can choose on the screen whether or not to view the page locally in your web browser, previously filled in on the ‘General’ card. There must be enough free memory to open the browser.
7. Upload
If everything is OK, the last step is to “upload” your page + associated images to your provider, i.e. copy them from your hard drive to your piece of your provider’s internet server. To do this, you usually use a separate FTP program, such as Transmit or Fetch. Transmit v 1.6 - a very nice program - can be found at https://www.panic.com.

The Toolbox
The HyperSite Toolbox consists of a number of buttons and pop-up menus that are located in the rectangle at the bottom left of each card.
On the left side are all formatting functions, e.g. to make text bold or italicized. You can also specify the size of text and the color. To do this, you always have to select a text section first, otherwise you will only hear a warning sound.
On the right are buttons to apply hyperlinks. A hyperlink is text that you can click on to jump somewhere else, e.g. a place elsewhere on your site (“anchor”, see below) or a completely different web-site (URL).
A link consists of 2 parts, i.e. the underlined word, which appears on the screen, and the real goal, often in the form of a URL address, e.g. “https://www.apple.com” (= Apple). If you select a piece of text before clicking on the button, that piece will be used as underlined text, and all you have to do is indicate the goal in the dialog box.
To mark a spot on one of your own pages as a target, insert an anchor, which consists of a special “tag” with a short name, which is not shown in a browser. All the anchors you have added to your stack up to that point will appear in a menu when you click on the anchor button. You can insert them as a hyperlink somewhere else.
Put the insertion point in the right place and click on the button with the face to insert a certain type of image on your page. You can choose from 3 types:
- GIF and JPEG files can be displayed directly in any graphical browser;
- QuickTime are videos that a person can only watch if he/she has loaded Apple's QuickTime plugin;
- Shockwave are animations (e.g. Macromedia Flash and Director), which also require a plug-in in Netscape and ActiveX and JAVA technology in Internet Explorer.
Constraints
The following items are not included in HyperSite:
- edit images and convert them to.GIF format (use Xres or the like);
- WYSIWYG formatting without seeing all tags (but preview via browser);
- apply external links via pop-up menu (use cut & paste);
- a graphical overview of all pages and links (which is nice);
Features I hope to add:
- alignment options (a working menu)
- (partial) check of all links (for now, use W3C Checklink [tested 2/2/2010].
History
Use case
As I tried various HTML editors, I realized that I would be better off creating a simple and limited program with HyperCard for my specific needs. Within 1 consistent layout, I can focus on the content, while this stack handles all the side issues: navigation links to the other pages of my site, changing the date of last modification, giving all pages a different color or bullet in 1 go, etc. At the same time, I learned a bit more about HTML 3.2, XHTML and even HTML5…
So this is what it has become, instead of about 4 pages for myself, already more than 6, and a lot more options than I had thought of initially.
Versions
- v 0.6 (March 1998)
- slowly built up using sample output from a commercial HTML editor.
- v 0.7 (May ‘98)
- finally does what I wanted, but wasn’t without bugs.
- v 0.8 (July 1998)
- some improvements (bug in tag fixed, speed ASCII conversion, correctly working tab strips at the top of the screen) and some additional wishes based on my own experience with the program (convert all pages in 1 click + option key, create tables within a field).
- v 1.0 (October 1998)
- contains extra options, e.g. whether or not to show the menu at the top left (for a different layout on the 1st page of a Site), to show the fixed image + header at the top right (ditto). Furthermore, some additional tools, o.a. HTML comment. Also fixed some minor bugs and strict HTML rules.
- V 1.1 and 1.2 (May-June ‘99)
- contains gradual improvements, e.g. to store parts of the site in subfolders - e.g. “docs:” - and still create all ‘links’ correctly.
- v 1.3 (Aug. ‘99)
- adds the ability to use JavaScript to use JavaScript ‘roll over’ effects to light up a navigation menu under your mouse (“hilite”). That’s now standard on the web, that’s why. For fast sites, you can always turn it off on the ‘General’ page. Also new is the ability to divide a part of the site into folders, completing the references to general interface and menu links via the “base URL” field. Furthermore, support for the “Language” Meta-Tag via a pop-up menu on the card “General” and a central Style Sheet (called “hyperstyle.css”) on the same map to control all formatting in 1 place using “Cascading Style Sheets” from HTML 4.0. For more info, see a good book on this subject. Also, the Tag for including Macromedia Flash images has been adjusted according to the latest information. DTD version in header: ‘HTML 4.0 Transitional’.
- v 1.5 (August 2000)
- Adds the ability to customize all backgrounds at once. Also added some extra tags to the toolbox: DIV and JS = JavaScript.
- v 1.6 (April 2001)
- Resolves some errors in the use of graphical (.GIF) buttons, so that unnecessary error messages do not occur. Also insert bottom cabinet HTML tags according to XHTML 1.0 specification, e.g. <br />. The pretection of the first 2 screens has also been improved; you can only get there if you explicitly click on the ? or General button.
- v 1.8
- complete port of Apple HyperCard stack to LiveCode.
- v 1.9 van 2018-2023
- HTML5 correct, including a responsive layout and w3 CSS styles.

Credits
This stack is shareware. Support the development of these helpful programs by paying your shareware fee. Please pay Euro 25,- next time you see me.
All programming © E.J. Broerse 04/1998 - 07/1998 - 09/1999 - 03/2000 - 04/2001 - 11/2002 - 02-2023 except PopUpMenu XCMD © Individual Software, Inc. 1988.
Enjoy Reading This Article?
Here are some articles you might like to read next: